Centos配置公钥登陆
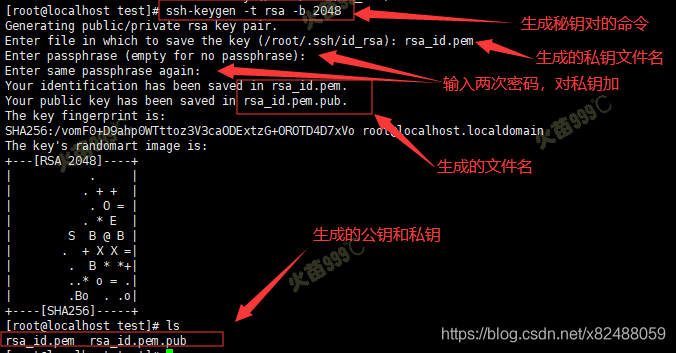
1、生成密钥对
1 | ssh-keygen -t rsa -b 2048 |
参数说明附录1
-t 加密算法
-b bit位数

2、切换到将要使用key登陆的用户部署公钥
切换用户1
su admin
cd到~1
cd ~
创建目录并修改权限。1
2mkdir .ssh
chmod 700 .ssh
配置公钥,将刚才生成的公钥复制到.ssh下并改名authorized_keys,修改权限为6001
2
3cp ~/test/rsa_id.pem.pub .ssh/
mv .ssh/rsa_id.pem.pub .ssh/authorized_keys
chmod 600 .ssh/authorized_keys
下载私钥到本地
3.配置ssh
切换到root编辑/etc/ssh/sshd_config1
vim /etc/ssh/sshd_config
找到#PermitRootLogin yes修改为PermitRootLogin no(禁止root登陆)
找到#RSAAuthentication yes修改为RSAAuthentication yes(启用RSA认证)
找到#PubkeyAuthentication yes修改为PubkeyAuthentication yes(启用Pubkey认证)
Centos默认AuthorizedKeysFile .ssh/authorized_keys配置是正确的,如果加了注释去掉#就好。
找到PasswordAuthentication yes修改为PasswordAuthentication no(禁止密码登陆,可以再测试使用key登陆成功后再修改)
重启sshd
Centos61
service sshd restart
Centos71
systemctl restart sshd
4.测试连接
1 | ssh -i rsa_id.pem admin@ip |
然后输入私钥的密码就可以登陆
附录1. ssh-keygen参数说明 ↩
usage: ssh-keygen [-q] [-b bits] [-t dsa | ecdsa | ed25519 | rsa | rsa1]
[-N new_passphrase] [-C comment] [-f output_keyfile]
ssh-keygen -p [-P old_passphrase] [-N new_passphrase] [-f keyfile]
ssh-keygen -i [-m key_format] [-f input_keyfile]
ssh-keygen -e [-m key_format] [-f input_keyfile]
ssh-keygen -y [-f input_keyfile]
ssh-keygen -c [-P passphrase] [-C comment] [-f keyfile]
ssh-keygen -l [-v] [-E fingerprint_hash] [-f input_keyfile]
ssh-keygen -B [-f input_keyfile]
ssh-keygen -D pkcs11
ssh-keygen -F hostname [-f known_hosts_file] [-l]
ssh-keygen -H [-f known_hosts_file]
ssh-keygen -R hostname [-f known_hosts_file]
ssh-keygen -r hostname [-f input_keyfile] [-g]
ssh-keygen -G output_file [-v] [-b bits] [-M memory] [-S start_point]
ssh-keygen -T output_file -f input_file [-v] [-a rounds] [-J num_lines]
[-j start_line] [-K checkpt] [-W generator]
ssh-keygen -s ca_key -I certificate_identity [-h] [-n principals]
[-O option] [-V validity_interval] [-z serial_number] file …
ssh-keygen -L [-f input_keyfile]
ssh-keygen -A
ssh-keygen -k -f krl_file [-u] [-s ca_public] [-z version_number]
file …
ssh-keygen -Q -f krl_file file …


